Tomato Sauce: An Adaptable Cooking Component
### Homemade Tomato Sauce: A Classic Comfort Food
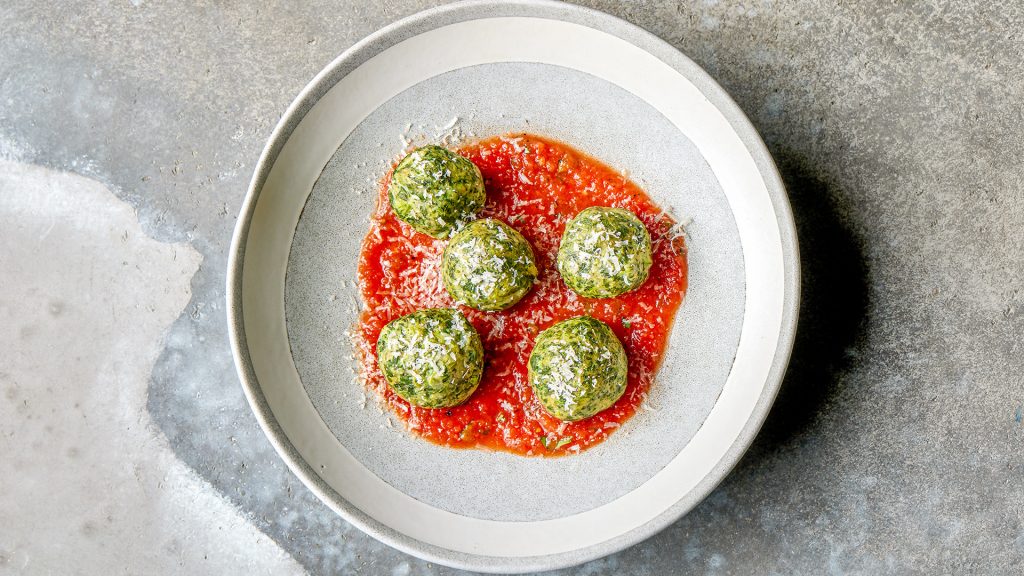
This homemade tomato sauce is crafted from canned tomatoes, fresh garlic, basil, parsley, and an array of seasonings. It exemplifies homemade comfort food at its finest. With its bright and tangy profile, the flavor transcends any store-bought alternatives. Ideal for pasta, pizza, or as a dip, this sauce is both adaptable and simple to make.
#### Flavor Profile
The sauce presents a lively and tangy taste, complemented by a touch of basil, making it a wonderful addition to many dishes. The freshness of the garlic and herbs elevates the overall flavor, resulting in a soothing and gratifying experience.
#### Skill Level
This recipe is suitable for beginners, needing minimal active preparation time. Everything is simmered to perfection in a single pot, making it a perfect option for less experienced cooks.
#### Serving Suggestions
Utilize this sauce as a dip for breadsticks or as a foundation for hearty sloppy joes. It pairs excellently with garlic bread or mozzarella sticks, providing a savory element to your starters.
#### Yield
The recipe can be easily doubled or tripled if you possess a sufficiently large pot. Any leftovers can be frozen for future enjoyment, ensuring you always have a delicious sauce ready to go.
### Ingredient Tips for Homemade Tomato Sauce
– **Tomatoes**: Choose high-quality canned tomatoes, like San Marzano, for optimal flavor. Diced or crushed tomatoes are ideal for a chunkier sauce, while fresh tomatoes can create a more intense flavor but will require longer cooking time.
– **Seasonings**: The sauce is flavored with basil, oregano, and parsley. To deepen the taste, you might add Italian seasoning, rosemary, or red pepper flakes.
– **Variations**: To achieve a creamier texture, incorporate heavy whipping cream after blending. You can also add sliced mushrooms, grated zucchini, or leftover vegetables to boost the nutritional content.
### Tips for Perfecting Your Sauce
– If the sauce appears too acidic, mitigate it by stirring in up to ½ teaspoon of sugar, honey, or ¼ cup of grated carrots.
– Simmer uncovered for a thicker texture, adding water or broth if it becomes too thick.
– For a smoother consistency, blend all or part of the sauce using an immersion blender right in the pot.
### Ways to Use Tomato Sauce
This homemade tomato sauce is remarkably versatile. Beyond pasta, it can serve in a variety of dishes, including:
– Dipping sauce for garlic bread or mozzarella sticks.
– Base for pizza or lasagna.
– Ingredient in soups or stews.
### Storing Leftovers
Preserve any remaining sauce in a covered container or mason jar in the refrigerator for up to 4 days. For extended storage, freeze in zippered bags for up to 3 months.
### Conclusion
This homemade tomato sauce is rich, fresh, and bursting with bold flavor. It’s a fundamental recipe that can enhance numerous dishes, making it an essential for anyone aiming to elevate their culinary skills. Relish in the comfort of homemade sauce and the fulfillment that comes from creating a delicious meal from scratch.
BBQ Chicken Flatbread Recipe
### Indulge in These Vibrant BBQ Chicken Flatbreads
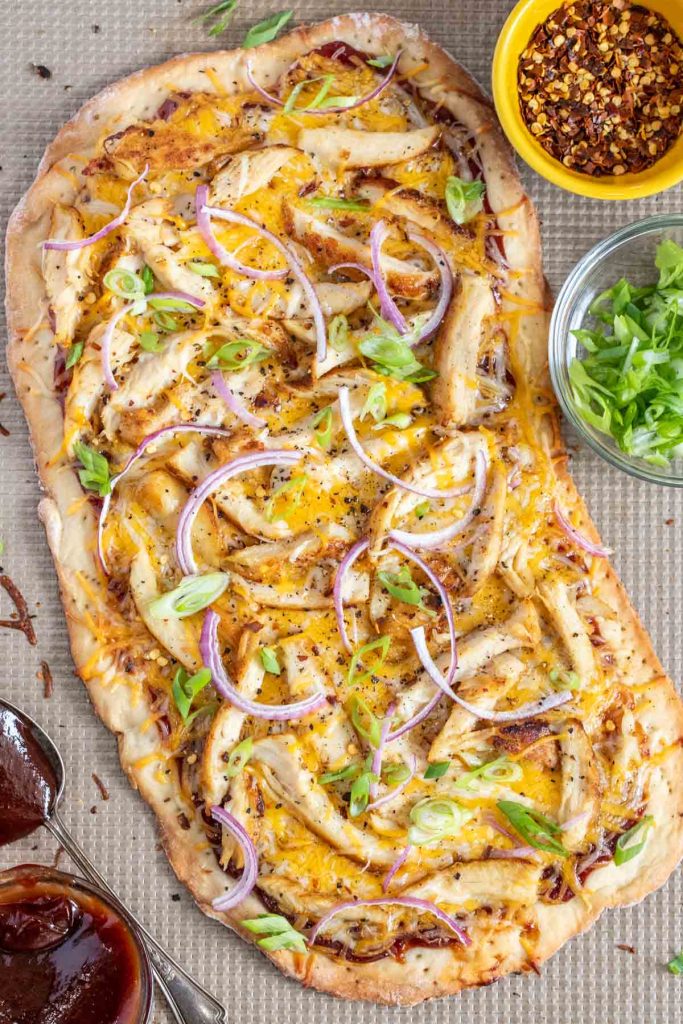
BBQ Chicken Flatbreads offer an exciting variation on classic pizza, presenting a tasty and vibrant meal that is bound to impress. Merging flavorful chicken with fresh veggies atop a cheesy, BBQ-smeared flatbread results in a dish that is both gratifying and attractive.
#### Recipe Ingredients
– **Mozzarella Cheese**: A rich cheese that complements the tastes in this dish wonderfully.
– **Smoked Paprika**: Introduces a smoky flavor to the chicken pieces adorning the flatbreads.
For an exhaustive list of ingredients and their measurements, check the recipe card.
#### Variations
– **Cheese**: If mozzarella isn’t to your liking, you might opt for cheddar cheese, Monterey jack cheese, or any cheese you prefer.
– **Bread**: Alternative choices for this recipe include naan bread or pizza crusts, which can impart a more classic pizza essence.
#### Instructions for Making BBQ Chicken Flatbreads
1. **Prepare the Chicken**: In a medium bowl, mix the chicken, olive oil, and spices. Toss until thoroughly coated.
2. **Cook the Chicken**: Heat a skillet over medium-high heat and sauté the chicken for around 6 minutes, or until browned and fully cooked (165°F).
3. **Preheat the Oven**: Set your oven to 425°F and prepare a rimmed baking sheet with parchment paper.
4. **Blend the Sauces**: In a small bowl, mix BBQ sauce and marinara sauce.
5. **Prep the Flatbreads**: Lay the flatbreads on the lined baking sheets and apply a thin coating of the sauce mixture over each.
6. **Add Toppings**: Disperse mozzarella cheese over the flatbreads, then layer with the cooked chicken, onion, and sweet peppers.
7. **Bake**: Place in the oven for 8-10 minutes until the cheese is melted and bubbly. Top with freshly chopped cilantro, slice, and savor!
#### FAQs
– **What other vegetables can I include on my BBQ Chicken flatbread pizza?**
You can incorporate bell peppers, cherry tomatoes, green onions, or corn kernels for additional flavor.
– **How can I embellish my Barbecue Chicken Flatbreads?**
Besides cilantro, think about drizzling extra BBQ sauce or ranch dressing on top for an added decorative flair.
#### Storage Information
Any leftover flatbreads can be kept in an airtight container in the fridge for 3-4 days. To reheat, use the oven at 375°F or microwave until thoroughly warmed.
### More Recipes to Appreciate
Discover more BBQ recipes and relish the range of flavors that can be created using simple ingredients. BBQ Chicken Flatbreads are not just simple to prepare but also a delightful means to gather friends and family for a scrumptious meal.

Unveiling the Aspects of Our Recently Remodeled Kitchen
As a food blogger and cookbook author who is also a busy parent, I spend a significant amount of time in my kitchen. A LOT! It’s not just my home—it serves as my workspace too!
After a decade of mentally reimagining our compact kitchen, Alex and I finally made the leap: we relocated! The new kitchen we found had solid structure; it just required some design enhancements. So, we dedicated countless hours on Pinterest crafting our dream kitchen. We’re thrilled to present it to you today, providing you with kitchen design inspiration for your own endeavors!
The vision we pursued
I am thrilled to unveil the results of this kitchen renovation—particularly for those who have followed us since our initial kitchen renovation in 2013 and this kitchen update in 2021. (Looking back at the first one, it’s fascinating to see how trends have evolved!)
You wouldn’t believe the countless hours I invested on Pinterest figuring all of this out!
Alex and I are huge fans of the current trend in British kitchen design (especially DeVOL), which embraces traditional design elements, unlacquered brass fixtures, and classic colors inspired by history.
We also aimed to create a kitchen that resembled a cooking show set, as we frequently use this kitchen in our Instagram cooking videos.
After consulting with a designer and builder about some costs, we concluded that, with Alex’s building expertise and my design acumen, we could tackle this kitchen renovation on our own. (Eek!)
Managing the work ourselves proved to be much more budget-friendly. Yet, it was undeniably more stressful (obviously). This also enabled us to design as we progressed, turning it into an enjoyable (and occasionally tense) collaborative project for the two of us.
(Here we are at the conclusion of the project: we did it! Since we’re not professional designers, we weren’t entirely certain if we could pull it off.)
The design project: before
After residing in the same home for a decade, Alex and I recently moved to a house just down the street. (Let me tell you, shifting 6 houses down is just as challenging as relocating across town!)
Originally built in the 1920s, the house had been entirely renovated by a contractor. While they added some lovely features, the kitchen design felt rather standard. What captivated us were the foundational elements: a spacious island, an actual walk-in butler’s pantry (dream come true!), and a coffee bar area.
What didn’t appeal to us: the generic atmosphere, the overly common blue-green-gray cabinet color (way too much!), the upper cabinets above the stove (which made it feel cramped), and the unfinished appearance of the coffee bar area.
The kitchen renovation—after!
Welcome to our new, warm, and inviting kitchen area! Much of the hardware and lighting in the original kitchen design was of lower quality metals and generic designs. We realized that achieving the custom aesthetic we desired necessitated replacing many of the hardware items.
Fortunately, we were able to partner with our dream brand: Rejuvenation, to bring this space to life! (We’re still pinching ourselves for having collaborated with this fantastic brand.) Their hardware is top-notch: both practical and aesthetically pleasing, which we are passionate about in our designs. (And recipes, too!) They supplied some of the hardware, lighting, and bar stools featured in these images to help realize our vision.
Here’s what we transformed:
1. Replaced all the hardware with unlacquered brass.
We adore how it turned out: it imparts a warm, historical vibe. You truly won’t believe the impact that hardware can have! If you’re looking to make a significant transformation in your kitchen, consider simply updating the hardware.
We utilized these Massey bin pulls, Ball knobs, and Grace drawer pulls from Rejuvenation.
2. Removed the upper cabinets and constructed a new hood.
This was the most adventurous aspect of the design! We actually removed the cabinets ourselves (which was quite daunting!) and designed and built this hood that is a more appropriate size for the range. We love how open it feels and it serves as a lovely white backdrop for our cooking videos.
We also incorporated an off-the-shelf open shelving unit that we painted to match the cabinets. We appreciate how the open shelving showcases our most frequently used and cherished kitchen items. Of course, we understand that many have thoughts on open shelving! Feel free to express them in the comments.
3. Acquired a new AGA induction range.
Isn’t it beautiful? This is the AGA Elise 36″ induction range. (We received a small discount from the brand for featuring this product—thanks AGA!)
We are completely enamored with cooking on induction, so it was essential for us to replace the gas range with an induction model. Here’s why we adore it: It’s more environmentally friendly, significantly easier to clean,

Complete Manual for Barbecuing on the 4th of July
With the 4th of July approaching, I’m envisioning the sound of the grill and the aroma of charcoal filling the air. There’s something enchanting about outdoor cooking – naturally, everything is enhanced with a touch of smoke, but I also appreciate how grilling brings everyone together around the flames.
I’ve been organizing our 4th of July menu for a little while now, and although I’m still pondering between grilled chicken thighs and marinated salmon for the main dish, I’m certain that our beloved grilled corn on the cob will make the cut!
## Why Grilled Corn Takes Center Stage
If you’ve never tried grilling corn before, the kernels turn out delightfully soft with stunning char marks, and the natural sugars caramelize into something truly *heavenly*. The smoky taste is unmatched by any other method.
I’ve been preparing grilled corn on the cob this way for ages. Kids adore it, and adults do too. You can serve it simply with butter, as Mexican street corn (elote), or in a grilled corn salad.
Here’s what makes it foolproof: you can grill it in the husk for moist, tender kernels, or shuck it beforehand for those beautiful grill marks. (Personally, I prefer shucking it first for those lovely grill marks!)
## Grilled Dinner Inspirations
Whether you lean towards chicken or seafood, the grill has something for everyone. Those grilled chicken thighs I mentioned? They remain incredibly juicy and develop the most wonderful crispy skin. You can also grill chicken breast (which I find equally delicious) and use it in a chicken pesto sandwich or grilled chicken salad.
For seafood enthusiasts, grilled shrimp skewers are always a favorite. The secret lies in the shrimp marinade – it adds a ton of flavor in a short amount of time. If you want to try something different, grilled fish tacos offer a fun, fresh twist. I also really enjoy this grilled tuna steak (it has such a meaty flavor!).
For those seeking vegan or vegetarian grilling options, our ultimate grilled veggie burger, grilled tofu, or grilled eggplant parmesan are sure to please a crowd.
While your corn and main proteins are cooking, don’t underestimate the value of excellent grilled side dishes. Once your corn is ready, think about rounding out your meal. I love assembling a variety of proteins and vegetables to satisfy everyone at the table.
For veggies, grilled zucchini, grilled green beans, or grilled squash are summer staples. I also can’t resist preparing veggie kabobs – there’s something enjoyable about eating off a stick that enhances the flavor.
Grilled garlic bread makes for a delightful side. Sometimes, we enjoy a grilled Caesar salad or these easy grilled potatoes in foil. Or, mix up elote salad using that grilled corn!
If you want to elevate your vegetable offerings, check out our guide to the finest grilled vegetables.
## Conclude with a Grilled Dessert!
Here’s a tip that’ll make your guests do a double-take: prepare a grilled dessert! We love grilled apples: the heat intensifies their sweetness and adds a subtle smoky note that pairs wonderfully with a scoop of vanilla ice cream.
You can also grill bananas and top them with vanilla ice cream, or even try grilled pineapple or grilled peaches!
## My Best Grilling Tips for Success
– **Begin with the corn.** Since grilled corn on the cob is quite forgiving, it’s ideal for adjusting your grill temperature just right while you prepare everything else.
– **Prepare in advance.** Most vegetables can be cut hours ahead of time. Your marinades will taste better when made in advance, and you’ll actually enjoy your own gathering.
– **Keep it straightforward.** The finest grilled food allows the natural flavors to stand out. Don’t overthink it – sometimes salt, pepper, and good olive oil are all that’s needed.
– **Utilize our cheat sheet.** Refer to these Grill Temperature Cheat Sheet for spontaneous grilling.
– **Have backup options.** The weather can be unpredictable, so know which items can be finished in the oven if necessary.
*What’s your favorite grilling strategy for the 4th? I’d love to know your favorite combinations in the comments below!*

Simple Summer Meal: Grilled Jerk Chicken paired with Mango Avocado Salsa
**Effortless Summer Meal: Grilled Jerk Chicken Accompanied by Mango Avocado Salsa**
Summer is an ideal season to relish light, tasty dishes that require little effort to prepare. One such recipe that embodies the spirit of summer is Grilled Jerk Chicken with Mango Avocado Salsa. This colorful dish fuses the piquant, fragrant notes of jerk seasoning with the invigorating, tropical flavors of mango and avocado, crafting a delightful contrast that will undoubtedly astonish your family and friends.
**Ingredients:**
*For the Jerk Chicken:*
– 4 boneless, skinless chicken breasts
– 2 tablespoons jerk seasoning (either store-bought or homemade)
– 2 tablespoons olive oil
– Juice of 1 lime
– Salt and pepper to taste
*For the Mango Avocado Salsa:*
– 1 ripe mango, peeled, pitted, and diced
– 1 ripe avocado, pitted and diced
– 1/4 cup red onion, finely chopped
– 1/4 cup fresh cilantro, chopped
– Juice of 1 lime
– Salt and pepper to taste
**Instructions:**
1. **Prepare the Chicken:**
– In a small bowl, mix the jerk seasoning, olive oil, lime juice, salt, and pepper. Combine thoroughly to create a marinade.
– Place the chicken breasts into a resealable plastic bag or shallow dish. Pour the marinade over the chicken, ensuring each piece is fully coated. Seal the bag or cover the dish and refrigerate for at least 30 minutes to let the flavors infuse.
2. **Make the Salsa:**
– In a medium bowl, combine the diced mango, avocado, red onion, and cilantro.
– Pour in the lime juice, salt, and pepper. Gently mix the ingredients until well combined. Let it sit to allow the flavors to enhance while grilling the chicken.
3. **Grill the Chicken:**
– Preheat your grill to medium-high heat. Lightly oil the grill grates to prevent sticking.
– Take the chicken from the marinade, letting any excess drip off. Place the chicken on the grill and cook for 6-7 minutes on each side, or until the internal temperature hits 165°F (75°C) and the chicken is thoroughly cooked.
– After cooking, take the chicken off the grill and let it rest for a few minutes before slicing.
4. **Serve:**
– Slice the grilled jerk chicken and arrange it on a serving platter.
– Spoon the mango avocado salsa over the chicken or serve on the side.
– Garnish with extra cilantro if desired.
**Tips for Success:**
– **Jerk Seasoning:** You can opt for store-bought jerk seasoning for ease, or craft your own blend using spices like allspice, thyme, cinnamon, nutmeg, and cayenne pepper for a more customized flavor.
– **Marinating Time:** For enhanced flavor, marinate the chicken for several hours or overnight in the refrigerator.
– **Salsa Variations:** Feel free to incorporate other elements into the salsa, such as diced tomatoes, jalapeños for a kick, or a splash of orange juice for extra sweetness.
This Grilled Jerk Chicken with Mango Avocado Salsa makes for an exceptional summer dinner that is straightforward to prepare and bursting with flavor. The spicy jerk chicken harmonizes beautifully with the sweet and creamy salsa, making it a dish destined to become a favorite at your summer events. Pair this meal with coconut rice or a crisp green salad for a well-rounded and enjoyable dinner.

Tomato Sauce: An Adaptable Cooking Component
### Homemade Tomato Sauce: A Classic Comfort Food
This homemade tomato sauce is crafted from canned tomatoes, fresh garlic, basil, parsley, and an array of seasonings. It exemplifies homemade comfort food at its finest. With its bright and tangy profile, the flavor transcends any store-bought alternatives. Ideal for pasta, pizza, or as a dip, this sauce is both adaptable and simple to make.
#### Flavor Profile
The sauce presents a lively and tangy taste, complemented by a touch of basil, making it a wonderful addition to many dishes. The freshness of the garlic and herbs elevates the overall flavor, resulting in a soothing and gratifying experience.
#### Skill Level
This recipe is suitable for beginners, needing minimal active preparation time. Everything is simmered to perfection in a single pot, making it a perfect option for less experienced cooks.
#### Serving Suggestions
Utilize this sauce as a dip for breadsticks or as a foundation for hearty sloppy joes. It pairs excellently with garlic bread or mozzarella sticks, providing a savory element to your starters.
#### Yield
The recipe can be easily doubled or tripled if you possess a sufficiently large pot. Any leftovers can be frozen for future enjoyment, ensuring you always have a delicious sauce ready to go.
### Ingredient Tips for Homemade Tomato Sauce
– **Tomatoes**: Choose high-quality canned tomatoes, like San Marzano, for optimal flavor. Diced or crushed tomatoes are ideal for a chunkier sauce, while fresh tomatoes can create a more intense flavor but will require longer cooking time.
– **Seasonings**: The sauce is flavored with basil, oregano, and parsley. To deepen the taste, you might add Italian seasoning, rosemary, or red pepper flakes.
– **Variations**: To achieve a creamier texture, incorporate heavy whipping cream after blending. You can also add sliced mushrooms, grated zucchini, or leftover vegetables to boost the nutritional content.
### Tips for Perfecting Your Sauce
– If the sauce appears too acidic, mitigate it by stirring in up to ½ teaspoon of sugar, honey, or ¼ cup of grated carrots.
– Simmer uncovered for a thicker texture, adding water or broth if it becomes too thick.
– For a smoother consistency, blend all or part of the sauce using an immersion blender right in the pot.
### Ways to Use Tomato Sauce
This homemade tomato sauce is remarkably versatile. Beyond pasta, it can serve in a variety of dishes, including:
– Dipping sauce for garlic bread or mozzarella sticks.
– Base for pizza or lasagna.
– Ingredient in soups or stews.
### Storing Leftovers
Preserve any remaining sauce in a covered container or mason jar in the refrigerator for up to 4 days. For extended storage, freeze in zippered bags for up to 3 months.
### Conclusion
This homemade tomato sauce is rich, fresh, and bursting with bold flavor. It’s a fundamental recipe that can enhance numerous dishes, making it an essential for anyone aiming to elevate their culinary skills. Relish in the comfort of homemade sauce and the fulfillment that comes from creating a delicious meal from scratch.
Read More
BBQ Chicken Flatbread Recipe
### Indulge in These Vibrant BBQ Chicken Flatbreads
BBQ Chicken Flatbreads offer an exciting variation on classic pizza, presenting a tasty and vibrant meal that is bound to impress. Merging flavorful chicken with fresh veggies atop a cheesy, BBQ-smeared flatbread results in a dish that is both gratifying and attractive.
#### Recipe Ingredients
– **Mozzarella Cheese**: A rich cheese that complements the tastes in this dish wonderfully.
– **Smoked Paprika**: Introduces a smoky flavor to the chicken pieces adorning the flatbreads.
For an exhaustive list of ingredients and their measurements, check the recipe card.
#### Variations
– **Cheese**: If mozzarella isn’t to your liking, you might opt for cheddar cheese, Monterey jack cheese, or any cheese you prefer.
– **Bread**: Alternative choices for this recipe include naan bread or pizza crusts, which can impart a more classic pizza essence.
#### Instructions for Making BBQ Chicken Flatbreads
1. **Prepare the Chicken**: In a medium bowl, mix the chicken, olive oil, and spices. Toss until thoroughly coated.
2. **Cook the Chicken**: Heat a skillet over medium-high heat and sauté the chicken for around 6 minutes, or until browned and fully cooked (165°F).
3. **Preheat the Oven**: Set your oven to 425°F and prepare a rimmed baking sheet with parchment paper.
4. **Blend the Sauces**: In a small bowl, mix BBQ sauce and marinara sauce.
5. **Prep the Flatbreads**: Lay the flatbreads on the lined baking sheets and apply a thin coating of the sauce mixture over each.
6. **Add Toppings**: Disperse mozzarella cheese over the flatbreads, then layer with the cooked chicken, onion, and sweet peppers.
7. **Bake**: Place in the oven for 8-10 minutes until the cheese is melted and bubbly. Top with freshly chopped cilantro, slice, and savor!
#### FAQs
– **What other vegetables can I include on my BBQ Chicken flatbread pizza?**
You can incorporate bell peppers, cherry tomatoes, green onions, or corn kernels for additional flavor.
– **How can I embellish my Barbecue Chicken Flatbreads?**
Besides cilantro, think about drizzling extra BBQ sauce or ranch dressing on top for an added decorative flair.
#### Storage Information
Any leftover flatbreads can be kept in an airtight container in the fridge for 3-4 days. To reheat, use the oven at 375°F or microwave until thoroughly warmed.
### More Recipes to Appreciate
Discover more BBQ recipes and relish the range of flavors that can be created using simple ingredients. BBQ Chicken Flatbreads are not just simple to prepare but also a delightful means to gather friends and family for a scrumptious meal.
Read More
Unveiling the Aspects of Our Recently Remodeled Kitchen
As a food blogger and cookbook author who is also a busy parent, I spend a significant amount of time in my kitchen. A LOT! It’s not just my home—it serves as my workspace too!
After a decade of mentally reimagining our compact kitchen, Alex and I finally made the leap: we relocated! The new kitchen we found had solid structure; it just required some design enhancements. So, we dedicated countless hours on Pinterest crafting our dream kitchen. We’re thrilled to present it to you today, providing you with kitchen design inspiration for your own endeavors!
The vision we pursued
I am thrilled to unveil the results of this kitchen renovation—particularly for those who have followed us since our initial kitchen renovation in 2013 and this kitchen update in 2021. (Looking back at the first one, it’s fascinating to see how trends have evolved!)
You wouldn’t believe the countless hours I invested on Pinterest figuring all of this out!
Alex and I are huge fans of the current trend in British kitchen design (especially DeVOL), which embraces traditional design elements, unlacquered brass fixtures, and classic colors inspired by history.
We also aimed to create a kitchen that resembled a cooking show set, as we frequently use this kitchen in our Instagram cooking videos.
After consulting with a designer and builder about some costs, we concluded that, with Alex’s building expertise and my design acumen, we could tackle this kitchen renovation on our own. (Eek!)
Managing the work ourselves proved to be much more budget-friendly. Yet, it was undeniably more stressful (obviously). This also enabled us to design as we progressed, turning it into an enjoyable (and occasionally tense) collaborative project for the two of us.
(Here we are at the conclusion of the project: we did it! Since we’re not professional designers, we weren’t entirely certain if we could pull it off.)
The design project: before
After residing in the same home for a decade, Alex and I recently moved to a house just down the street. (Let me tell you, shifting 6 houses down is just as challenging as relocating across town!)
Originally built in the 1920s, the house had been entirely renovated by a contractor. While they added some lovely features, the kitchen design felt rather standard. What captivated us were the foundational elements: a spacious island, an actual walk-in butler’s pantry (dream come true!), and a coffee bar area.
What didn’t appeal to us: the generic atmosphere, the overly common blue-green-gray cabinet color (way too much!), the upper cabinets above the stove (which made it feel cramped), and the unfinished appearance of the coffee bar area.
The kitchen renovation—after!
Welcome to our new, warm, and inviting kitchen area! Much of the hardware and lighting in the original kitchen design was of lower quality metals and generic designs. We realized that achieving the custom aesthetic we desired necessitated replacing many of the hardware items.
Fortunately, we were able to partner with our dream brand: Rejuvenation, to bring this space to life! (We’re still pinching ourselves for having collaborated with this fantastic brand.) Their hardware is top-notch: both practical and aesthetically pleasing, which we are passionate about in our designs. (And recipes, too!) They supplied some of the hardware, lighting, and bar stools featured in these images to help realize our vision.
Here’s what we transformed:
1. Replaced all the hardware with unlacquered brass.
We adore how it turned out: it imparts a warm, historical vibe. You truly won’t believe the impact that hardware can have! If you’re looking to make a significant transformation in your kitchen, consider simply updating the hardware.
We utilized these Massey bin pulls, Ball knobs, and Grace drawer pulls from Rejuvenation.
2. Removed the upper cabinets and constructed a new hood.
This was the most adventurous aspect of the design! We actually removed the cabinets ourselves (which was quite daunting!) and designed and built this hood that is a more appropriate size for the range. We love how open it feels and it serves as a lovely white backdrop for our cooking videos.
We also incorporated an off-the-shelf open shelving unit that we painted to match the cabinets. We appreciate how the open shelving showcases our most frequently used and cherished kitchen items. Of course, we understand that many have thoughts on open shelving! Feel free to express them in the comments.
3. Acquired a new AGA induction range.
Isn’t it beautiful? This is the AGA Elise 36″ induction range. (We received a small discount from the brand for featuring this product—thanks AGA!)
We are completely enamored with cooking on induction, so it was essential for us to replace the gas range with an induction model. Here’s why we adore it: It’s more environmentally friendly, significantly easier to clean,
Read More
Complete Manual for Barbecuing on the 4th of July
With the 4th of July approaching, I’m envisioning the sound of the grill and the aroma of charcoal filling the air. There’s something enchanting about outdoor cooking – naturally, everything is enhanced with a touch of smoke, but I also appreciate how grilling brings everyone together around the flames.
I’ve been organizing our 4th of July menu for a little while now, and although I’m still pondering between grilled chicken thighs and marinated salmon for the main dish, I’m certain that our beloved grilled corn on the cob will make the cut!
## Why Grilled Corn Takes Center Stage
If you’ve never tried grilling corn before, the kernels turn out delightfully soft with stunning char marks, and the natural sugars caramelize into something truly *heavenly*. The smoky taste is unmatched by any other method.
I’ve been preparing grilled corn on the cob this way for ages. Kids adore it, and adults do too. You can serve it simply with butter, as Mexican street corn (elote), or in a grilled corn salad.
Here’s what makes it foolproof: you can grill it in the husk for moist, tender kernels, or shuck it beforehand for those beautiful grill marks. (Personally, I prefer shucking it first for those lovely grill marks!)
## Grilled Dinner Inspirations
Whether you lean towards chicken or seafood, the grill has something for everyone. Those grilled chicken thighs I mentioned? They remain incredibly juicy and develop the most wonderful crispy skin. You can also grill chicken breast (which I find equally delicious) and use it in a chicken pesto sandwich or grilled chicken salad.
For seafood enthusiasts, grilled shrimp skewers are always a favorite. The secret lies in the shrimp marinade – it adds a ton of flavor in a short amount of time. If you want to try something different, grilled fish tacos offer a fun, fresh twist. I also really enjoy this grilled tuna steak (it has such a meaty flavor!).
For those seeking vegan or vegetarian grilling options, our ultimate grilled veggie burger, grilled tofu, or grilled eggplant parmesan are sure to please a crowd.
While your corn and main proteins are cooking, don’t underestimate the value of excellent grilled side dishes. Once your corn is ready, think about rounding out your meal. I love assembling a variety of proteins and vegetables to satisfy everyone at the table.
For veggies, grilled zucchini, grilled green beans, or grilled squash are summer staples. I also can’t resist preparing veggie kabobs – there’s something enjoyable about eating off a stick that enhances the flavor.
Grilled garlic bread makes for a delightful side. Sometimes, we enjoy a grilled Caesar salad or these easy grilled potatoes in foil. Or, mix up elote salad using that grilled corn!
If you want to elevate your vegetable offerings, check out our guide to the finest grilled vegetables.
## Conclude with a Grilled Dessert!
Here’s a tip that’ll make your guests do a double-take: prepare a grilled dessert! We love grilled apples: the heat intensifies their sweetness and adds a subtle smoky note that pairs wonderfully with a scoop of vanilla ice cream.
You can also grill bananas and top them with vanilla ice cream, or even try grilled pineapple or grilled peaches!
## My Best Grilling Tips for Success
– **Begin with the corn.** Since grilled corn on the cob is quite forgiving, it’s ideal for adjusting your grill temperature just right while you prepare everything else.
– **Prepare in advance.** Most vegetables can be cut hours ahead of time. Your marinades will taste better when made in advance, and you’ll actually enjoy your own gathering.
– **Keep it straightforward.** The finest grilled food allows the natural flavors to stand out. Don’t overthink it – sometimes salt, pepper, and good olive oil are all that’s needed.
– **Utilize our cheat sheet.** Refer to these Grill Temperature Cheat Sheet for spontaneous grilling.
– **Have backup options.** The weather can be unpredictable, so know which items can be finished in the oven if necessary.
*What’s your favorite grilling strategy for the 4th? I’d love to know your favorite combinations in the comments below!*
Read More
Simple Summer Meal: Grilled Jerk Chicken paired with Mango Avocado Salsa
**Effortless Summer Meal: Grilled Jerk Chicken Accompanied by Mango Avocado Salsa**
Summer is an ideal season to relish light, tasty dishes that require little effort to prepare. One such recipe that embodies the spirit of summer is Grilled Jerk Chicken with Mango Avocado Salsa. This colorful dish fuses the piquant, fragrant notes of jerk seasoning with the invigorating, tropical flavors of mango and avocado, crafting a delightful contrast that will undoubtedly astonish your family and friends.
**Ingredients:**
*For the Jerk Chicken:*
– 4 boneless, skinless chicken breasts
– 2 tablespoons jerk seasoning (either store-bought or homemade)
– 2 tablespoons olive oil
– Juice of 1 lime
– Salt and pepper to taste
*For the Mango Avocado Salsa:*
– 1 ripe mango, peeled, pitted, and diced
– 1 ripe avocado, pitted and diced
– 1/4 cup red onion, finely chopped
– 1/4 cup fresh cilantro, chopped
– Juice of 1 lime
– Salt and pepper to taste
**Instructions:**
1. **Prepare the Chicken:**
– In a small bowl, mix the jerk seasoning, olive oil, lime juice, salt, and pepper. Combine thoroughly to create a marinade.
– Place the chicken breasts into a resealable plastic bag or shallow dish. Pour the marinade over the chicken, ensuring each piece is fully coated. Seal the bag or cover the dish and refrigerate for at least 30 minutes to let the flavors infuse.
2. **Make the Salsa:**
– In a medium bowl, combine the diced mango, avocado, red onion, and cilantro.
– Pour in the lime juice, salt, and pepper. Gently mix the ingredients until well combined. Let it sit to allow the flavors to enhance while grilling the chicken.
3. **Grill the Chicken:**
– Preheat your grill to medium-high heat. Lightly oil the grill grates to prevent sticking.
– Take the chicken from the marinade, letting any excess drip off. Place the chicken on the grill and cook for 6-7 minutes on each side, or until the internal temperature hits 165°F (75°C) and the chicken is thoroughly cooked.
– After cooking, take the chicken off the grill and let it rest for a few minutes before slicing.
4. **Serve:**
– Slice the grilled jerk chicken and arrange it on a serving platter.
– Spoon the mango avocado salsa over the chicken or serve on the side.
– Garnish with extra cilantro if desired.
**Tips for Success:**
– **Jerk Seasoning:** You can opt for store-bought jerk seasoning for ease, or craft your own blend using spices like allspice, thyme, cinnamon, nutmeg, and cayenne pepper for a more customized flavor.
– **Marinating Time:** For enhanced flavor, marinate the chicken for several hours or overnight in the refrigerator.
– **Salsa Variations:** Feel free to incorporate other elements into the salsa, such as diced tomatoes, jalapeños for a kick, or a splash of orange juice for extra sweetness.
This Grilled Jerk Chicken with Mango Avocado Salsa makes for an exceptional summer dinner that is straightforward to prepare and bursting with flavor. The spicy jerk chicken harmonizes beautifully with the sweet and creamy salsa, making it a dish destined to become a favorite at your summer events. Pair this meal with coconut rice or a crisp green salad for a well-rounded and enjoyable dinner.
Read More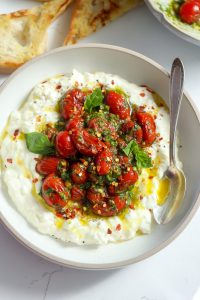
Burrata Cheese Accompanied by Crushed Cherries and Pistachios
### Burrata with Crushed Cherries and Pistachios
Last summer, a laid-back barbecue evolved into a delightful culinary adventure when a friend showed up with a bag filled with ingredients. Without any clean utensils, we resorted to using our hands to assemble a colorful platter featuring burrata, cherries, and pistachios. This tactile approach not only made for an enjoyable cooking experience but also led to a dish that was consumed almost immediately. This article will direct you in recreating this straightforward yet delicious platter, ideal for summer gatherings or any event.
#### Ingredients
– **1 pound (455 grams) burrata**
– **1 pound (455 grams) fresh cherries**
– **Olive oil**
– **1/3 cup (40 grams) salted, shelled pistachios**
– **A sprig or two of fresh mint**
– **Flaky sea salt**
– **Freshly ground black pepper**
– **Crostini for serving**
#### Instructions
1. **Prepare the Burrata**: Drain the burrata on a paper towel and allow it to reach room temperature for maximum creaminess. Tear the burrata into pieces and distribute them on a serving tray.
2. **Prepare the Cherries**: Rather than using a cherry pitter, crush or cut the cherries open. To crush, use the side of a knife or the bottom of a sturdy glass to press on the cherry until the pit can be easily removed. Split the cherries in half and scatter them atop the burrata. Drizzle any juice that collects over the dish for added flavor.
3. **Add Olive Oil**: Drizzle olive oil over the cherries and burrata to amplify the dish’s richness.
4. **Prepare the Pistachios**: Roughly chop the pistachios or crush them into uneven pieces with the back of a heavy pot. Sprinkle the crushed pistachios over the cherries and burrata.
5. **Season**: Complete the dish with flaky sea salt, freshly ground black pepper, and fresh mint leaves.
6. **Serve**: Pair the platter with crostini for dipping and relish as the dish quickly vanishes.
#### Tips for Success
– **Burrata Temperature**: For optimal flavor and texture, let the burrata sit at room temperature before serving.
– **Ingredient Quality**: Choose the freshest cherries available, as their flavor is the highlight of the dish.
– **Variations**: If burrata is not accessible, consider using stracciatella or high-quality fresh ricotta as substitutes.
This informal recipe is ideal for summer get-togethers, enabling you to craft a stunning dish with minimal effort and maximum flavor. Savor the delightful mix of creamy burrata, sweet cherries, and crunchy pistachios, all elevated by the freshness of mint and the richness of olive oil.
Read More
Bruschetta-Style Beef Patties
Burgers featuring fresh mozzarella, tomatoes generously infused with garlic, onions, basil, and a dash of balsamic vinegar present a delightful variation on a summertime classic. These bruschetta-style burgers merge the rich flavors of Italian bruschetta with the robust satisfaction of a burger.
Bruschetta, a staple Italian appetizer, consists of grilled bread adorned with a blend of tomatoes, garlic, olive oil, balsamic vinegar, and salt. This zesty topping is ideally crafted to elevate the flavor profile of a succulent burger.
To prepare these burgers, begin by blending ground beef with grated onion, minced garlic, finely chopped basil, oregano, salt, and pepper. Shape the blend into patties and grill them to your preferred doneness. While the patties are cooking, whip up the tomato mixture by mixing diced tomatoes, extra virgin olive oil, balsamic vinegar, minced garlic, finely chopped red onion, sliced basil, and a touch of salt and pepper. Let the mixture rest for a few moments to allow the flavors to combine.
Once the patties are ready, crown each one with a slice of fresh mozzarella cheese and let it melt. Construct the burgers by setting the patties on buns, topping them with the tomato mixture, and optionally brushing the buns with garlic oil before lightly toasting them.
These bruschetta burgers serve as a refreshing and tasty alternative to conventional burgers, with the fresh ingredients and Italian-inspired toppings delivering a distinct culinary delight. Savor them as a delectable summer dish that embodies the spirit of both Italian and American fare.
Read More
An Overview of Dubai’s Chocolate Sector and Products
# If You Consider Dubai Chocolate to Be Overpriced and/or Have Yet to Experience It, You Should Try Crafting This at Home Immediately
Dubai chocolate has been gaining popularity for quite a while, enchanting chocolate aficionados worldwide. If you haven’t had the opportunity to indulge in this extravagant delight or believe it to be too costly, you can replicate it right in your own kitchen. The procedure might appear challenging, yet it’s easier than you can imagine.
## What is Dubai Chocolate?
Dubai chocolate is a distinct filled chocolate bar crafted by the Emirati Fix Dessert Chocolatier located in Dubai. It boasts a milk chocolate coating filled with a delicious blend of sweet pistachio and tahini cream, enhanced by finely chopped knafeh. The outcome is a sweet and crunchy sensation, with a roasted nuttiness from the pistachios and tahini, augmented by the crispy texture of knafeh.
## The Components of a Dubai Chocolate Bar
– **Exterior**: Traditionally crafted with milk chocolate, Dubai chocolate is now offered in dark and white varieties, frequently embellished with colorful chocolate splashes.
– **Interior**: The filling is a creamy pistachio green, highlighting strands of crispy kadayif, delivering a distinctive texture and flavor contrast to the chocolate shell.
## How to Create Dubai Chocolate at Home
### Ingredients
– 2 tbsp unsalted butter
– 1 batch kadayif (approximately 2 cups chopped)
– 1/2 lb dark chocolate (chopped)
– 3/4 cup pistachio cream
– 1.5 tbsp tahini
– 1 pinch of salt
### Instructions
1. **Prepare the Kadayif**: If ladayif is unavailable, you can make it using flour, cornstarch, and water. Sift the flour and cornstarch together, mix in water and oil, and pipe the batter into a non-stick pan to create thin strands.
2. **Toast the Kadayif**: Melt butter in a skillet, add chopped kadayif, and toast until golden brown (around 8-10 minutes). Allow it to cool.
3. **Temper the Chocolate**: Melt two-thirds of the chocolate using a double boiler, then incorporate the remaining chocolate to cool it and achieve a silky consistency.
4. **Create the Chocolate Shell**: Coat the chocolate bar molds with melted chocolate and let them set in the refrigerator.
5. **Combine the Filling**: Mix together the pistachio cream, tahini, and salt in a bowl, then fold in the toasted kadayif.
6. **Stuff the Chocolate Bar**: Spoon the filling into the chocolate shells, filling them about three-quarters full.
7. **Seal the Chocolate Bar**: Pour additional melted chocolate over the filling to seal it, and let it set until firm.
8. **Savor**: Gently unmold your homemade Dubai chocolate and relish the delightful taste!
## What is the Flavor of Dubai Chocolate Like?
The taste is a delightful combination of sweetness and saltiness, with the dark chocolate providing depth, the tahini contributing a roasted nuttiness, and the pistachio cream offering a sweet richness. The kadayif introduces a crunchy texture, making every bite a unique experience.
## The Popularity of Dubai Chocolate
Dubai chocolate has surged in popularity on social media, particularly TikTok, where its one-of-a-kind texture and vibrant filling garnered the attention of influencers and chocolate lovers alike. The exclusivity of the treat, being mostly accessible in Dubai, has only enhanced its appeal.
## Conclusion
Crafting Dubai chocolate at home not only enables you to indulge in this exquisite delight without the steep price, but it also provides the joy of creating something delectable from scratch. With a little patience and the appropriate ingredients, you can enjoy this trendy chocolate bar at your convenience.
Read More
Creamy Corn Dip Recipe for Big Get-Togethers
### Creamy Baked Corn Dip: A Tasty Starter
Sweet corn, crispy vegetables, and savory bacon unite in a delicious baked dip that’s ideal for social events and gatherings. This creamy, cheesy corn dip boasts a mixture of flavors reminiscent of Mexican street corn, elevated by the rich essence of cheese and the smoky depth of bacon. With the perfect hint of spiciness, it’s a hit that will have everyone coming back for more.
#### Flavor Profile
The dip merges the sweetness of corn with the crunch of fresh veggies and the savory flavor of bacon. The incorporation of spices and creamy cheese infuses a zesty flavor profile that strikes a balance between comforting and exhilarating.
#### Skill Level
This recipe is suitable for beginners, needing only basic kitchen tools. Just blend the ingredients, bake, and serve right from the baking dish, making tidying up simple.
#### Budget-Friendly Tips
To maximize the recipe, think about adding black beans or leftover chicken during the mixing process. This not only boosts flavor but also contributes protein and fiber.
#### Serving Suggestions
This dip is adaptable and pairs well with a range of dippers. Complement it with fresh vegetables like celery, zucchini slices, and bell pepper scoops. For a crunchier alternative, serve with tortilla chips, Fritos corn chips, or homemade crostini.
### Ingredient Tips for Corn Dip
– **Corn**: Opt for fresh corn removed from the cob, thawed frozen corn, or drained canned corn for optimal results.
– **Dairy**: A mix of sour cream, cream cheese, and shredded cheddar cheese delivers a decadent and creamy foundation. Greek yogurt can be used instead of sour cream for a lighter variation.
– **Add-Ins**: Crumbled bacon brings a fantastic crunch and smoky essence, but feel free to swap it for diced ham or leftover ground beef.
– **Variations**: Elevate the dip with vibrant additions such as chopped green onions, black olives, or jalapeños. For an extra kick, consider incorporating diced jalapeños or a dash of hot sauce.
### Preparation Instructions
1. **Preheat Oven**: Preheat your oven to 350°F and prepare a baking dish with cooking spray.
2. **Mix Dairy**: In a large mixing bowl, blend softened cream cheese and sour cream until creamy.
3. **Combine Ingredients**: Stir in corn, red bell pepper, green chilies, bacon, cilantro, chili powder, cumin, salt, pepper, and 1 cup of shredded cheese. Mix thoroughly.
4. **Transfer to Dish**: Evenly distribute the mixture into the prepared baking dish and sprinkle the remaining ½ cup of cheese on top.
5. **Bake**: Bake for 30 minutes or until the dip bubbles and the cheese is melted.
6. **Garnish and Serve**: Optionally add extra corn, peppers, bacon, and cilantro for garnish. Serve right away with your choice of dippers.
### Storing Corn Dip
Unused corn dip can be stored in a sealed container in the refrigerator for up to 4 days. It can be enjoyed cold or warmed up in the microwave. For extended storage, freeze in zippered bags for up to one month. After defrosting, mix in fresh sour cream to revive creaminess.
### Nutritional Information
Each serving of this creamy corn dip has approximately:
– **Calories**: 164
– **Carbohydrates**: 8g
– **Protein**: 7g
– **Fat**: 12g
– **Sodium**: 420mg
### Conclusion
This creamy baked corn dip is both simple to make and a guaranteed favorite at any gathering. With its rich flavors and satisfying consistency, it’s an excellent addition to your appetizer list. Enjoy it hot or cold, and make sure to share your feedback!

Revitalizing Watermelon Frozen Treats Recipe
Who is to determine when a popsicle qualifies as a popsicle? Allow me to clarify: these watermelon popsicles consist of frozen segments of watermelon on sticks. (Or not on sticks—you could freeze slices or wedges and utilize the rind for a solid grip.) I experimented with making watermelon popsicles in molds and honestly prefer the texture and taste of these uncomplicated pops.
These watermelon popsicles are invigorating, easy, and fruity treats perfect for summer. Here are a few more reasons to whip up these watermelon wonders:
– They are the simplest popsicles I’ve ever created, needing just one ingredient and meticulous slicing.
– They serve as an excellent way to use up excess watermelon. Watermelons can be quite large.
– They are less messy for young children to consume than fresh watermelon (watermelon juice stains can be surprisingly tough to clean off fabrics). Adults will like them too, perhaps even more so with a squeeze of lime juice or a dash of chili-lime seasoning.
Moreover, how adorable are the cookie-cutter shapes? The star design would be a hit for Independence Day celebrations or summer birthdays. I’m already planning to make these for Grace’s birthday bash. You’ll discover a photo guide and recipe below.
How to Prepare Watermelon Popsicles
To start, determine if you’d prefer cookie-cutter shapes, wedges, or slices. Here are your options:
– Cookie-cutter shapes are enjoyable. For this, you will need cookie cutters and popsicle sticks. This technique results in some leftover scraps, and ideas for those can be found in the section below.
– Wedges are simple to handle.
– Slices remind me of classic popsicle mold shapes. You can even grate the frozen slices on a large box grater to create watermelon shaved ice!
Cut your watermelon accordingly. Find a rimmed baking sheet or tray that fits in your freezer shelf, and line it with parchment paper to avoid sticking. Arrange each popsicle on the paper with a bit of space; you can layer more parchment paper and popsicles on top.
Freeze until firm (about four hours), then enjoy or move them to a freezer bag to avoid freezer burn.
Watermelon Selection Advice
Your popsicles will taste as delicious and sweet as the watermelon you choose, so pick a good one. My preferred variety is Sugar Baby watermelons, but any flavorful watermelon will do.
When selecting a watermelon, look for one that is:
– Heavy for its size
– Dull, not shiny
– Symmetrically shaped
– Dark green, featuring a yellow to orange “field spot” that signifies it has ripened properly on the vine (the more vibrant the yellow-orange hue, the better)
Ideas for Leftover Watermelon
If you transform your entire watermelon into frozen wedges or slices, you won’t have any scraps to deal with. If you create cookie-cutter-shaped popsicles, there will be leftover pieces of watermelon.
Perhaps you only wish to convert a portion of a big watermelon into popsicles. Here are some ideas for those leftovers:
More Popsicles and Frozen Treats
If you like this recipe, consider trying one of these next:
Kindly share your thoughts on your frozen watermelon in the comments. It’s such a simple and refreshing summer treat!
Watermelon Popsicles
Frozen watermelon is the ideal chilled summer indulgence! Create these watermelon popsicles and savor them throughout the summer. The yield varies depending on the size of your watermelon; make as many or as few popsicles as you desire.
1. Using a sharp chef’s knife, remove the stem end and the opposite end. Position the watermelon upright on a flat side. Slice it in half vertically. Set one half against the cutting board with the flat side facing down.
2. For cookie-cutter shapes, cut across the watermelon to create ½-inch thick slabs. Press the cookie cutter down to form shapes. Repeat with the other half of the watermelon. Insert popsicle sticks approximately ¾-inch into the base of each shape.
3. For wedges, slice lengthwise down the center for large wedges or generate smaller wedges by slicing lengthwise one-third of the way from each side, meeting in the middle. Then cut across the watermelon repeatedly to produce ½-inch wide wedges. Repeat with the other half of the watermelon.
4. For long strips, slice lengthwise along the watermelon to create about 4 to 5 even sections, then slice across those segments to produce ½-inch wide strips.
5. Locate a tray or baking dish that fits in your freezer. Line it with parchment paper and arrange the watermelon in a single layer, ensuring space between each piece to prevent sticking. If more space is required, add an additional layer of parchment paper on top to create a new layer. Freeze until solid, approximately 4 hours.
6. Transfer the popsicles to a freezer bag for storage in the freezer for up to 3 months (the bag helps to prevent freezer burn). Enjoy!